

The Bridge I Wish Someone Had Drawn for Me Seven Years Ago
The first time I tried to connect a TradingView webhook to a live Python execution layer, I was running small accounts across Bybit, Binance, and Bitget from a laptop. The signal fired at 3:47 AM on a Tuesday. My laptop had gone to sleep. The alert routed to an email that I read four hours later. The trade I had spent two weeks refining in Pine Script never executed. The market had moved 6.2 percent in the meantime. The strategy was correct. The infrastructure was not.
That experience is the reason I no longer treat the TradingView-to-Python bridge as a beginner topic. It is the single most consequential piece of plumbing in any retail-to-professional transition. The strategy logic is the easy part. Pine Script is approachable, the charting is excellent, the alert builder is straightforward. The hard part is the moment after the alert fires, when a JSON payload leaves TradingView’s servers and needs to land somewhere that will actually do something with it before the opportunity decays. Most retail operators never cross that gap. The ones who do stop being retail operators.
This guide is the bridge I wish someone had drawn for me seven years ago. It is built from the actual architecture I run today across multiple exchange accounts, the mistakes I made along the way, and the specific failure modes that cost me real capital while I was learning. If you are searching for “TradingView webhook to Python” or “TradingView automated trading,” you are at exactly the same junction I was at. The path forward is not complicated. It does require getting a few specific things right.
Why Webhooks Beat Every Other Integration Pattern
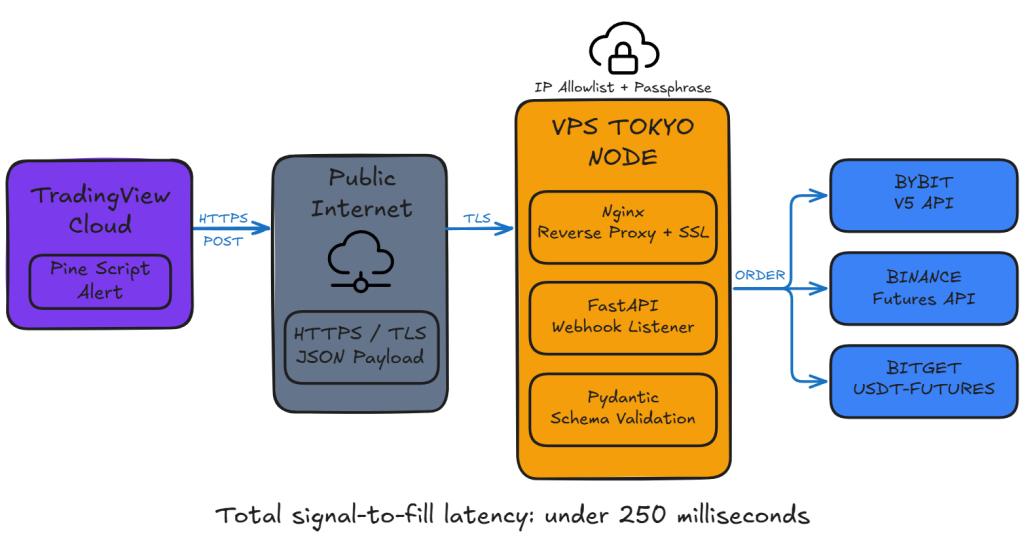
There are exactly three ways to translate a TradingView signal into a live trade. The first is manual execution, where you receive a popup alert and click buy yourself. This is not algorithmic trading. The second is polling, where your Python bot runs continuously and asks an exchange API every few seconds whether some condition has been met, replicating your TradingView logic locally. This works but it is structurally redundant; you are paying for TradingView’s analytical engine and then duplicating its work in Python, with the inevitable drift between the two implementations producing signals that do not match. The third is webhooks, where TradingView’s own servers detect the condition and push a notification to your Python endpoint within milliseconds. This is the structurally correct answer, and it is the one TradingView itself recommends in their official webhook documentation.
The latency difference between polling and webhook execution is not academic. A polling bot that checks the exchange every five seconds will, on average, react 2.5 seconds after the TradingView alert would have fired. In crypto, where the typical reaction window for a clean entry is under one second on a strong signal, that delay is the difference between filling at the intended price and chasing a candle that has already moved. The webhook architecture compresses that gap to the round-trip time between TradingView’s servers and your VPS, which on a properly configured Tokyo or Singapore VPS is typically under 200 milliseconds.
The Stack: Why FastAPI and Not Flask
I started with Flask. Most tutorials online still use Flask. It works, in the sense that it accepts the POST request and runs the handler. It also has a structural ceiling that becomes apparent the moment you start running multiple strategies in parallel.
Flask handles requests synchronously by default. If your handler makes a call to the Bybit API to place an order, and that call takes 800 milliseconds to complete, every other incoming webhook is queued behind it. When you have one strategy on one symbol, this is fine. When you have a portfolio of seven strategies across twelve symbols, all running on a 15-minute timeframe that produces clusters of simultaneous alerts at the candle close, the queueing becomes a real bottleneck. I watched this happen on my own infrastructure during a CPI release in late 2024. Three alerts fired within the same second. The third one was processed forty-one seconds later. By the time it executed, the entry was gone.
FastAPI is built on async/await primitives from the ground up. The same three simultaneous webhooks are processed concurrently, with the Python event loop managing the network I/O without blocking. The migration cost is small, the syntax is nearly identical, and the structural ceiling is dramatically higher. The other practical advantage is Pydantic validation. Every incoming webhook is checked against a typed schema before the handler logic runs. A malformed payload, a missing field, a wrong type, all of these are rejected at the framework level with a clear error response, before they can cause damage.
The VPS Decision: Where the Server Actually Lives
The webhook listener does not run on your laptop. I cannot state this strongly enough. A laptop on a residential ISP, with dynamic IP allocation, sleep timers, Windows Update reboots, and the ambient instability of consumer hardware, is not a place where trading capital should pass through. Every operator who has run a serious bot has the same story about the time their bot was offline during exactly the move it was built to capture.
The correct deployment target is a VPS in a data center geographically close to your exchange’s matching engine. For Bybit, Binance, OKX, and most major crypto venues, the relevant data centers are in Tokyo or Singapore. The physical proximity matters because every millisecond of network latency is a millisecond during which the price can move against your fill. I run my own infrastructure on a Tokyo-hosted VPS and the round-trip time from TradingView to my server averages 180 milliseconds, with the order placement to Bybit completing in under 50 milliseconds after that. Total signal-to-fill latency is consistently under 250 milliseconds, which is competitive with most retail-tier algorithmic operations.
The VPS does not need to be expensive. A 2 vCPU, 4GB RAM instance is more than adequate for a webhook listener handling dozens of strategies. What matters is location, uptime guarantee, and a static IP address. The static IP is essential because TradingView’s webhook configuration points at a specific address, and if your IP changes, every alert silently fails until you update the configuration.
The Implementation
The code below is the actual structure I deploy, simplified for clarity but production-posture. It includes the security layer, structured logging, payload validation, and a clear separation between the webhook receiver and the execution module. The execution module itself is intentionally a stub here; that is the subject of a separate piece on Bybit order management that I will publish next.
import logging
import os
import time
from typing import Optional

from fastapi import FastAPI, HTTPException, Request
from pydantic import BaseModel, Field, ValidationError

logging.basicConfig(
    level=logging.INFO,
    format="%(asctime)s [%(levelname)s] %(message)s",
    handlers=[
        logging.FileHandler("/var/log/nql/webhook.log"),
        logging.StreamHandler(),
    ],
)
logger = logging.getLogger("nql.webhook")

WEBHOOK_PASSPHRASE = os.environ.get("NQL_WEBHOOK_PASSPHRASE")
if not WEBHOOK_PASSPHRASE:
    raise RuntimeError("NQL_WEBHOOK_PASSPHRASE environment variable is required")

ALLOWED_ACTIONS = {"buy", "sell", "close_long", "close_short", "close_all"}
ALLOWED_EXCHANGES = {"BYBIT", "BINANCE", "BITGET", "OKX"}

app = FastAPI(title="Nova Quant Webhook Receiver", version="1.0.0")


class TradingViewSignal(BaseModel):
    passphrase: str
    action: str
    ticker: str = Field(min_length=3, max_length=20)
    exchange: str
    price: float = Field(gt=0)
    volume: float = Field(gt=0)
    strategy_id: str
    timeframe: Optional[str] = None
    bar_time: Optional[str] = None


@app.post("/tv-webhook")
async def receive_webhook(signal: TradingViewSignal, request: Request):
    received_at = time.perf_counter()
    client_ip = request.client.host if request.client else "unknown"

    if signal.passphrase != WEBHOOK_PASSPHRASE:
        logger.warning("rejected_passphrase ip=%s strategy=%s",
                       client_ip, signal.strategy_id)
        raise HTTPException(status_code=401, detail="invalid passphrase")

    if signal.action.lower() not in ALLOWED_ACTIONS:
        logger.warning("rejected_action action=%s strategy=%s",
                       signal.action, signal.strategy_id)
        raise HTTPException(status_code=400, detail="invalid action")

    if signal.exchange.upper() not in ALLOWED_EXCHANGES:
        logger.warning("rejected_exchange exchange=%s strategy=%s",
                       signal.exchange, signal.strategy_id)
        raise HTTPException(status_code=400, detail="unsupported exchange")

    logger.info(
        "signal_accepted strategy=%s action=%s ticker=%s exchange=%s "
        "price=%.4f volume=%.4f tf=%s",
        signal.strategy_id, signal.action, signal.ticker,
        signal.exchange, signal.price, signal.volume,
        signal.timeframe or "n/a",
    )

    try:
        execution_result = await route_to_execution(signal)
    except Exception as exc:
        logger.exception("execution_failed strategy=%s err=%s",
                         signal.strategy_id, exc)
        raise HTTPException(status_code=500, detail="execution layer error")

    elapsed_ms = (time.perf_counter() - received_at) * 1000.0
    logger.info("signal_processed strategy=%s elapsed_ms=%.2f",
                signal.strategy_id, elapsed_ms)

    return {
        "status": "accepted",
        "strategy": signal.strategy_id,
        "elapsed_ms": round(elapsed_ms, 2),
        "execution": execution_result,
    }


async def route_to_execution(signal: TradingViewSignal) -> dict:
    return {"status": "stub", "would_execute": signal.dict()}


@app.get("/health")
async def health_check():
    return {"status": "ok", "service": "nql-webhook"}
A few details in this code matter more than they might appear. The passphrase is loaded from an environment variable, never hardcoded. I cannot count the number of GitHub repositories I have seen with hardcoded passphrases that are now part of public training data. The allowed actions and exchanges are explicit allowlists rather than freeform strings; this prevents typos in your Pine Script alert from causing undefined behavior on the server. The logging includes a strategy ID on every line, which becomes essential when you are diagnosing why one specific strategy fired incorrectly while seven others were running cleanly. The health endpoint exists because every uptime monitor I have used requires it, and you will eventually want one.
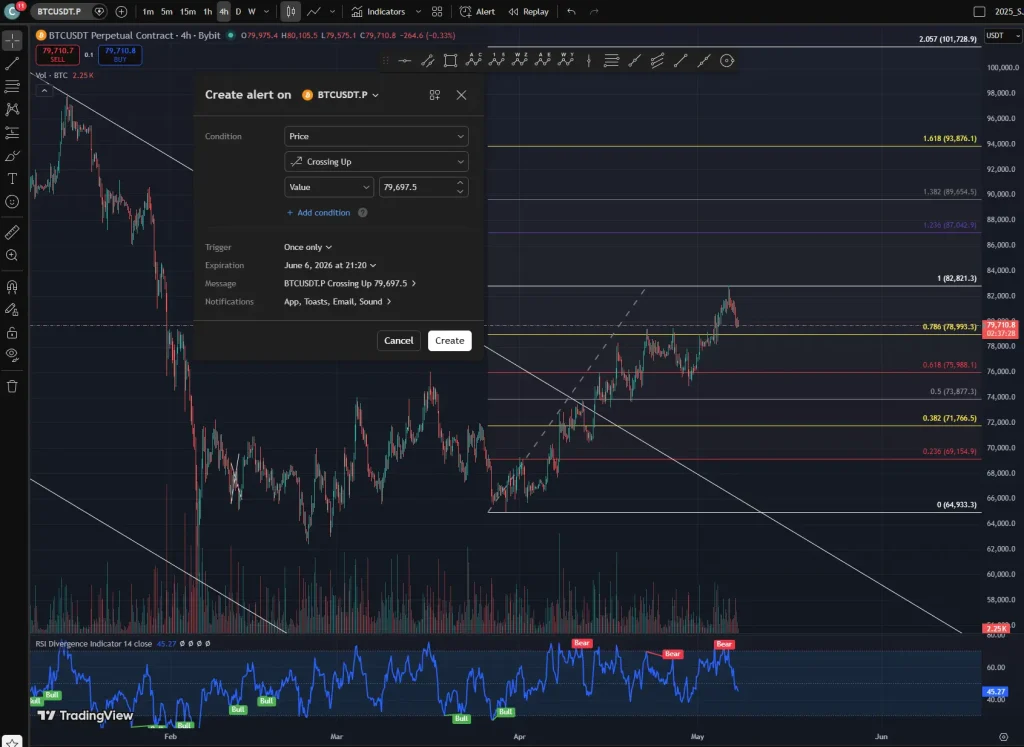
The Pine Script Side: Configuring the Alert Correctly
One operational note before the configuration details. The webhook URL field in TradingView’s alert dialog is available on the Essential plan and above. The free plan supports the alert engine itself, the Pine Script logic, and the JSON message body, but does not expose the webhook delivery field. Most operators serious enough to be reading this guide will eventually upgrade, but the practical path is to build and test the entire architecture first using TradingView’s free tier with a manual trigger workflow, then upgrade only when you are ready to go live with automated execution. The screenshots below show the alert configuration dialog as it appears in the standard interface; the webhook URL field appears in the Notifications tab on paid plans.
The alert message in TradingView is where most operators silently break their own pipeline. The webhook URL goes in the dedicated webhook URL field, not in the message body. The message body must contain the JSON payload, with TradingView’s placeholder syntax for dynamic fields. The exact template I use is:
{
  "passphrase": "your-actual-passphrase-here",
  "action": "{{strategy.order.action}}",
  "ticker": "{{ticker}}",
  "exchange": "{{exchange}}",
  "price": {{close}},
  "volume": {{strategy.order.contracts}},
  "strategy_id": "your_strategy_name_v1",
  "timeframe": "{{interval}}",
  "bar_time": "{{timenow}}"
}
The double-curly placeholders are filled by TradingView at the moment the alert fires. The string fields stay quoted; the numeric fields ({{close}} and {{strategy.order.contracts}}) are bare. This distinction matters because Pydantic will reject a payload where price arrives as the string “65000” instead of the number 65000. I have lost trades to exactly this typo. Verify the JSON is valid by pasting it into JSON Formatter & Validator with sample values substituted in.
Security: The Layer Everyone Skips Until It Hurts
A passphrase is a minimum, not a complete defense. The passphrase travels with every payload, and if it ever leaks, an attacker can submit arbitrary trades to your endpoint. The two additional layers I run, both of which I recommend as non-optional, are IP allowlisting and HTTPS.
TradingView publishes the IP ranges its webhook servers operate from. Configuring your VPS firewall to accept inbound traffic on port 443 only from these specific ranges eliminates the entire population of internet scanners and opportunistic attackers. On Ubuntu, this is a few ufw commands. The current TradingView webhook IP ranges are listed at their official documentation page; verify this list periodically because they update it.
HTTPS via Let’s Encrypt and an Nginx reverse proxy is the second layer. Plain HTTP transmits your passphrase in cleartext over the public internet. Anyone with packet capture access to any router along the path can read it. Nginx in front of Uvicorn, with a free Let’s Encrypt certificate refreshed automatically by certbot, gives you full transport encryption in about fifteen minutes of setup time. There is no excuse to skip this.
The Failure Modes I Have Personally Hit
The catalog of ways this pipeline can break is finite, and I have lived through most of it. Sharing the list here may save you the same lessons.
The silent IP change. My VPS provider migrated my instance during scheduled maintenance and the IP changed. TradingView kept sending alerts to the old IP. I did not notice for two days because no errors surfaced anywhere; the alerts simply went into a void. The fix is to monitor the webhook log for activity and alert yourself when no signals have arrived for longer than your strategies’ typical interval.
The expired SSL certificate. Let’s Encrypt certificates last 90 days. If certbot’s renewal cron job fails, the certificate expires and TradingView’s webhook delivery starts failing with TLS errors. The fix is to verify certbot’s renewal log monthly and to set up an external uptime monitor that alerts on certificate expiration.
The Pine Script that fires twice. A strategy with an entry condition that briefly flickers true-false-true at the candle boundary will fire two webhooks for what is logically one signal. The fix is server-side deduplication based on the bar_time field, rejecting any signal with the same strategy_id and bar_time within a short window.
The exchange rate limit during signal clusters. Seven strategies firing at the same minute close on different symbols can collectively exceed the exchange’s order-placement rate limit. The fix is a token bucket rate limiter on the execution side, smoothing the order submission rate to stay safely under the limit.
None of these are theoretical. Each one of them cost me either money or sleep before I built the corresponding defense. Build them in from the start.
What Happens After the Webhook Lands
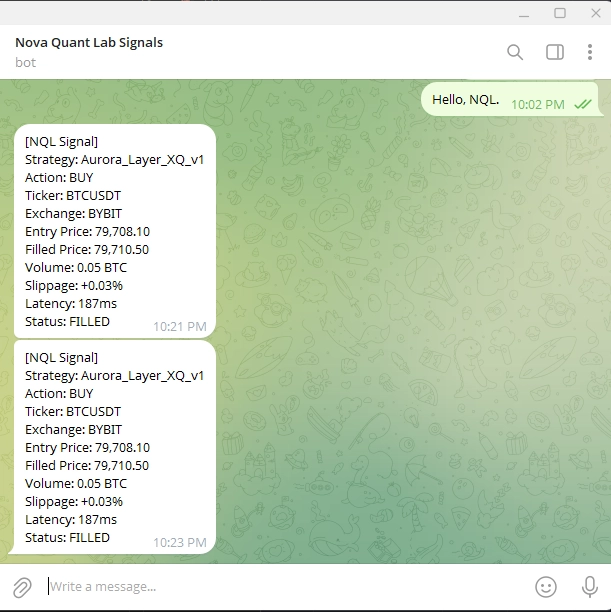
The webhook receiver is the front door. The execution module behind it is what actually places, manages, and closes orders on the exchange, and it is a substantially harder engineering problem. Order routing, slippage control, partial fill handling, position size verification, and reconciliation between the bot’s internal state and the exchange’s actual state are all separate disciplines that compound into a robust execution layer. I will cover that side of the architecture, specifically for Bybit’s V5 API where I run most of my live capital, in a separate piece. The webhook receiver documented here is what feeds it.
The architecture also extends naturally into a notification system. Every signal that hits the webhook should also push a Telegram or Discord message to your phone, with the strategy name, the action, and the resulting fill. This gives you human oversight without requiring you to watch a screen. The transparency of seeing every trade as it happens, combined with the discipline of letting the algorithm execute without intervention, is the operational sweet spot that keeps a quant operator sane during drawdowns. For VPS-side considerations on running this listener 24/7, see my VPS deployment guide.
The Honest Take
The TradingView-to-Python bridge is the single highest-leverage piece of infrastructure a transitioning trader can build. It does not require a finance degree. It does not require institutional capital. It requires roughly two evenings of focused work, a $10-per-month VPS, and the willingness to do the security and monitoring properly rather than skipping straight to the trading logic. Most operators skip the security and monitoring. Those operators eventually have a story about the time their endpoint got hit by a bot scanner, or their certificate expired during a major news event, or their strategy fired into a void because they did not know their IP had changed.
The architecture documented here is not the most sophisticated one possible. There are operators running gRPC microservice meshes across multiple regions with Redis-backed deduplication queues and Prometheus metrics dashboards. That is a fine endpoint to grow toward. It is not where you start. You start with one VPS, one FastAPI listener, one Pine Script alert, and the discipline to verify each link of the chain before moving on to the next. The operators who build this foundation properly are the ones whose strategies are still running cleanly two years later. The operators who skip steps are the ones who keep rebuilding from scratch every time something breaks. Pick which kind you want to be early, because the choice compounds.